Adding a new Group
Groups are used to contain and organise Contacts. You can only add Contacts once you have added at least one Group.
IN THIS ARTICLE
| How to add a Group | Understanding Group Defaults | Customising Subscriber Pages |
| How to hide a group from Unsubscribes |
How to add a Group
Adding a new group is very simple:
Click Contacts at the top of the screen and select Groups
Click + Add a New Group > fill in the required details on the form to create your new Group
Understanding Group Defaults
Each Group in Transpond has its own default settings. Here's what you need to know:
Group Name: Enter a name for the group. This name will ONLY be shown to you and other staff/users on the control panel. It will not be displayed to Contacts.
Friendly Name: Enter a friendly name for the group. This name WILL be shown to Contacts so make sure it makes sense. For example "www.transpond.io website signup users"
Default From Name: When you go to send a campaign, we will use the name you enter here as a default "From" name on the emails that get sent. You can always change this whenever you send a campaign.
Default From Email Address: Similar to the "Default From Name", anything you enter here will become the default "sent from" email address on any campaigns you send. Again, you can always override this when you go to send a campaign.
Subscriber Reminder Text: This text is shown to customers when they have received a campaign and choose to "view their profile". It is important you enter a good paragraph or two of text in this box explaining, how and why they ended up in your group. For example you might write "Contacts in this group signed up through our website registration form at www,thewebsiteofyours.com and opted to receive emails."
Once you have completed all of the fields, simply click Add New Group and your new group will be added and ready for you to start adding contacts.
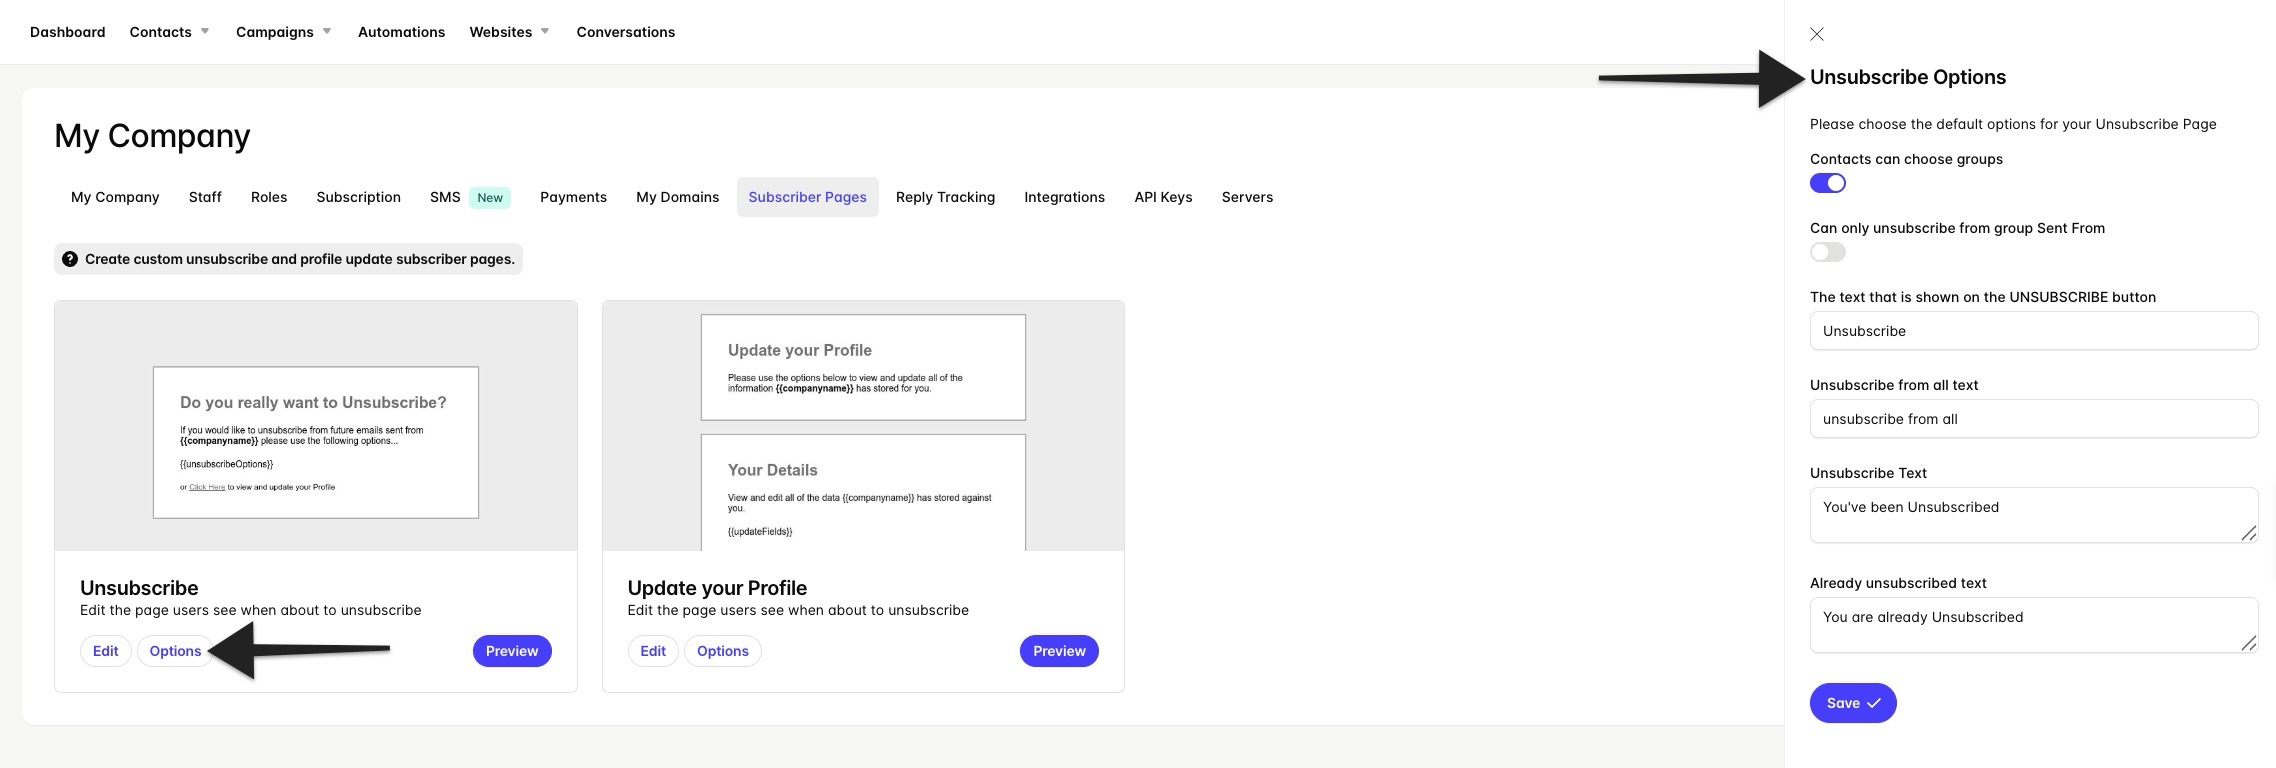
Customising Subscriber Pages
Transpond lets you customise what your contacts see when they click to unsubscribe from emails or update their preferences. These are called Subscriber Pages and can be customised for all Groups or for individual Groups.
To customise for all Groups:
- In Transpond, click on your name in the top right corner > Account Settings.
- Go to the Subscriber Pages tab, click on the Edit button next to the Subscriber page you want to edit.
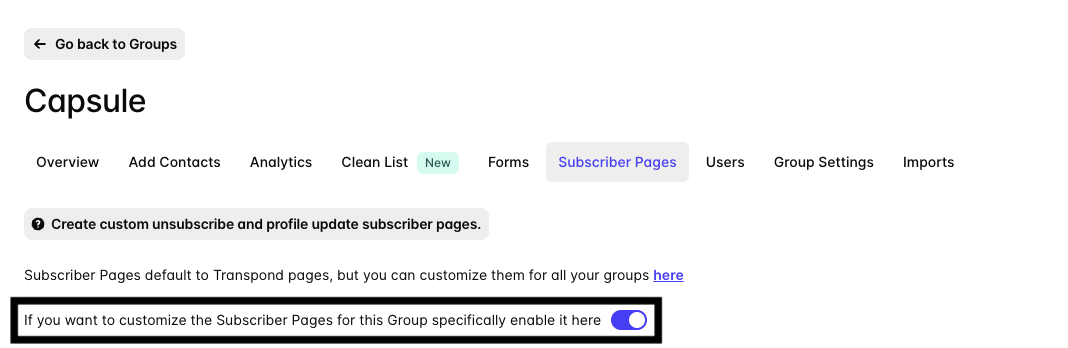
To customise for an individual Group:
- In Transpond, go the Contacts tab, then click on the name of the Group.
- On the Subscriber Pages tab, use the toggle to turn the option on.
- Choose the Edit button next to the Subscriber page you want to edit .
Subscriber Page Fields
Both types of Subscriber Page use Merge Tags to add personalised information from your Transpond account. Both will include the following fields:
- {{companyname}} - taken from the Company Name field in Account Settings > My Company
- {{unsubscribeOptions}} - inputs Unsubscribe or Unsubscribe from all into the view
On the Update your Profile Page, you will also find {{updatefields}}. This Merge Tag will show their Email address by default.
To make a specific field visible (and therefore updatable), go to Contacts > Fields > use the check box in the Hidden column to either hide or unhide it from the Subscriber Page.
Contacts will not be able to update their Email address whilst updating their preferences, as this is the unique identifier for their Contact.
Subscriber Page Defaults
There are a number of defaults you can set for each Subscriber Page to customise the experience for your Contacts. To do this, use the Options button under each page.
This includes the settings to:
- Edit the display text for a specific button
- Edit the following display text after clicking a specific button
- Choose how much control the Contact has over the Groups they are a part of
How to hide a group from Unsubscribes
Sometimes it can be helpful to stop your contacts from being able to unsubscribe from specific groups. Normally when a contact uses the 'Unsubscribe' or 'Update profile' links, they get to see a list of all the Groups they belong to.
This is great for when you want contacts to choose their interests for example. However, some Groups can be used for important legal updates for example, and in that case you don't want t to encourage people to remove themselves from those groups.
In that situation, you can hide a group from the list of options. To do that:
- Go to Contacts > Groups
- Click on the Group name
- Go to the Group Settings tab
- From there, scroll down to 'Other Settings' and toggle the option for 'Hidden from Unsubscribers'.
- Press the Save button and you're all done.
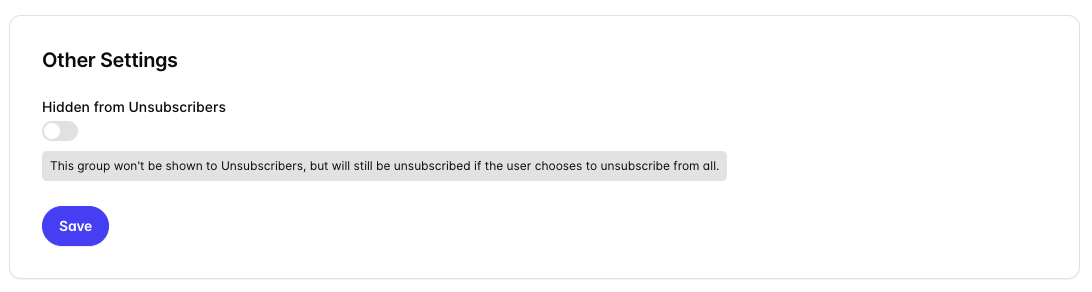
It's important to know that contacts can still unsubscribe from hidden groups by using the 'Unsubscribe from all' option.